Organization Admin Guide
Everything an organization Owner or Admin needs to manage members, control access, configure the AI backend, manage billing, and maintain security.
Roles and permissions
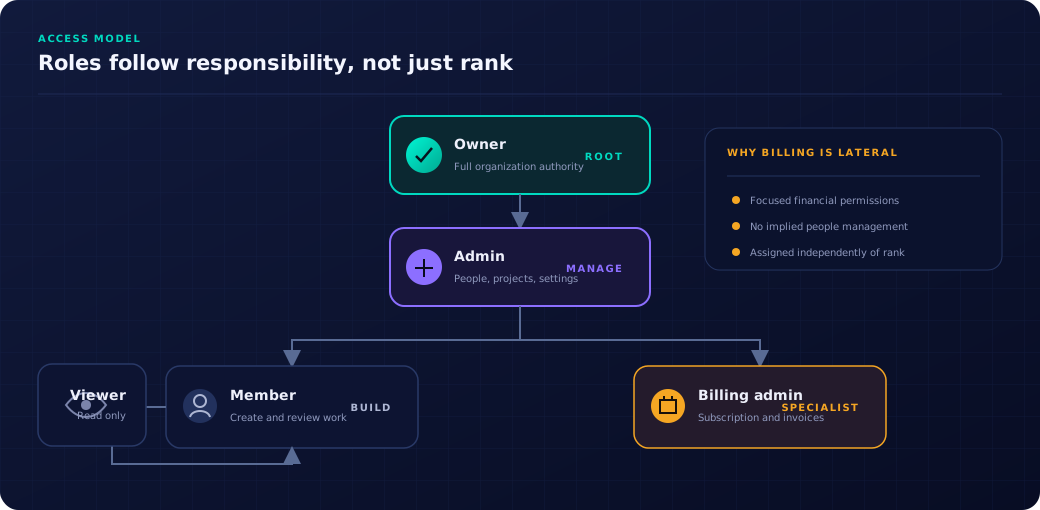
Every member of an organization has exactly one role. Roles determine what actions they can take across all projects in the organization.
| Permission | Owner | Admin | Billing Admin | Member | Viewer |
|---|---|---|---|---|---|
| View content (features, stories, test cases) | ✓ | ✓ | ✓ | ✓ | ✓ |
| Create and edit features, stories, prompts, documents | ✓ | ✓ | — | ✓ | — |
| Trigger AI story slicing | ✓ | ✓ | — | ✓ | — |
| Manage connectors | ✓ | ✓ | — | ✓ | — |
| Invite members | ✓ | ✓ | — | — | — |
| Manage members and roles | ✓ | ✓ | — | — | — |
| Manage org settings (name, slug, Definition of Ready, LLM) | ✓ | ✓ | — | — | — |
| Manage billing and subscription | ✓ | — | ✓ | — | — |
Role hierarchy
Inviting members
Go to Settings → Organization and scroll to the Members section. Enter the email address of the person you want to invite and click Invite.
- The invited user must already have a registered Storymate account.
- They will receive an email with an invitation link that expires after 7 days.
- Pending invitations are listed under the Members section and can be revoked at any time.
- Invitations can only be sent by users with the
INVITE_MEMBERSpermission (Owner or Admin).
Changing member roles
In the Members table, use the role dropdown next to any member to change their role. Changes take effect immediately. You cannot demote yourself below your current role — an Owner must transfer ownership first.
Removing a member
Click the remove button next to a member in the table. They lose all access to the organization immediately. Any content they created (features, stories, prompts) is retained under the organization.
Managing projects
Projects have their own member list independent of the organization member list. A project member must be an organization member first. Admins and Owners can manage project membership from the project's settings page.
| Project Role | Description |
|---|---|
| Admin | Can manage project settings, members, and all content within the project. |
| Member | Can create and edit features, slice stories, review, and push to connectors. |
| Viewer | Read-only access to all project content. |
LLM provider configuration and model routing
By default, Storymate uses its built-in AI backend. Organization Admins can configure custom LLM providers under Settings → LLM Providers. This routes story slicing, test case generation, and other AI tasks through your own AI backends.
Supported providers
- OpenAI — Standard OpenAI-compatible endpoint. Enter your API key and model name.
- Azure OpenAI — Enter the Azure endpoint URL, API key, deployment name, and API version.
- AWS Bedrock — Enter your Bedrock endpoint and credentials.
- Google Vertex AI — Enter your Vertex endpoint and credentials.
- Anthropic — Direct Anthropic API access with your own API key.
- OpenRouter — Access 200+ models through a single API. Enter your OpenRouter API key; available models are fetched dynamically.
- Ollama — Local or self-hosted models. Enter the Ollama server URL; available models are fetched dynamically via
/api/tags. - Any OpenAI-compatible endpoint — Enter a custom base URL for any OpenAI-compatible service.
LLM profiles
You can create multiple LLM profiles and designate one as the default. The default is used for all slicing operations unless a user overrides it at slice time. Each profile stores the provider, model name, and any provider-specific parameters (temperature, max tokens, etc.).
Model routing (per-task)
Storymate supports per-task model routing, allowing you to assign different models to different AI tasks:
- Story slicing — the primary model for decomposing features into stories.
- Feature analysis — description analysis and gap detection.
- Test case generation — generating Gherkin or structured test cases.
- Sprint planning — generating sprint allocations and goals.
- DoR extraction — parsing DoR text into rules.
- Persona discovery — suggesting personas from context.
- Estimation — generating story point estimates.
The model routing configuration is available under Settings → LLM Providers → Model Routing. A routing resolution table shows which model is used for each task, making overrides and fallbacks visible at a glance.
LLM cost and usage observability
Storymate tracks per-task LLM usage and cost:
- Token counts — input and output tokens per task, per model.
- Cost tracking — estimated cost per operation based on model pricing.
- Usage dashboard — available under Settings → LLM Providers → Usage, showing daily/weekly/monthly consumption.
- Per-feature breakdown — see how many tokens and how much cost each feature consumed during slicing.
Usage data is retained for 90 days and can be exported as CSV.
Definition of Ready
Go to Settings → General to manage your Definition of Ready. You can write the Definition of Ready statement yourself in a text field and let AI analyze it and suggest improvements, or let AI deduce one from an uploaded document (Word, PDF, text) or a Confluence page URL. If a Confluence connector is configured, private pages from that Confluence site are fetched with the connector credentials.
Below the statement you can manage Definition of Ready rules. Each rule is a short label that defines a quality requirement (e.g. "Must have at least 2 acceptance criteria", "Must include a non-functional requirement"). Enable or disable rules individually.
Enabled rules are evaluated automatically after each story is generated. Violations are shown as advisory warnings on story cards — they do not block approval.
Notifications and webhooks
Configure outbound webhooks under Settings → Notifications to receive real-time events from Storymate. Supported webhook types:
- Slack — Post to a Slack Incoming Webhook URL.
- Microsoft Teams — Post to a Teams Incoming Webhook URL.
- Generic HTTP — POST JSON payload to any HTTP endpoint.
Events that trigger webhooks include story slicing completion, story approval, and connector push results.
API tokens (webhook tokens)
Machine-to-machine access to the Storymate API uses API tokens. Manage them under Settings → Organization → Webhook Tokens.
-
1
Enter a label
Give the token a descriptive label (e.g. "CI Pipeline", "Zapier Integration") so you can identify it later.
-
2
Click "Create Token"
The secret is shown once. Copy it immediately — it will not be displayed again.
-
3
Use in requests
Send the token as a
Bearertoken in theAuthorizationheader of API requests.
API Access is available on the Business plan.
Audit logs
Go to Settings → Audit Log to view a full chronological record of all organization-level actions. The log captures:
- Member invitations, role changes, and removals
- Connector creation, updates, and deletions
- LLM settings changes
- Story slicing triggers and push operations
- Billing changes and plan upgrades
- API token creation and revocation
Each entry records the timestamp, the acting user, and the resource affected. The log is paginated and searchable. It cannot be cleared or modified.
Audit Logs are available on the Business plan.
Billing and subscription
Go to Settings → Billing to manage your subscription. Only users with the MANAGE_BILLING permission (Owner or Billing Admin) can access this page.
Plan tiers
| Plan | Custom Prompts | Documents | Test Cases | API Access | Audit Logs | SAML SSO |
|---|
| Plan | Custom Prompts | Documents | Test Cases | API Access | Audit Logs | SAML SSO |
|---|---|---|---|---|---|---|
| Solo Basic | — | — | — | — | — | — |
| Solo Pro | ✓ | ✓ | ✓ | — | — | — |
| Business | ✓ | ✓ | ✓ | ✓ | ✓ | ✓ |
Upgrading or changing plans
Click Upgrade or Change Plan on the Billing page. You will be redirected to the Stripe billing portal. Upgrades take effect immediately. Downgrades take effect at the end of the current billing period.
Cancelling
Click Cancel Subscription on the Billing page. Access continues until the end of the paid period. Data is retained for 90 days after cancellation, after which it is permanently deleted in accordance with GDPR data retention policies.
General organization settings
Under Settings → Organization, Owners and Admins can:
- Rename the organization — updates the display name across the application.
- Change the slug — the URL-safe identifier for the organization. Changing the slug does not break existing sessions but will affect any bookmarked URLs.