Set up Storymate in minutes
From registration to your first AI-generated story set — this guide walks you through the entire onboarding flow.
Overview
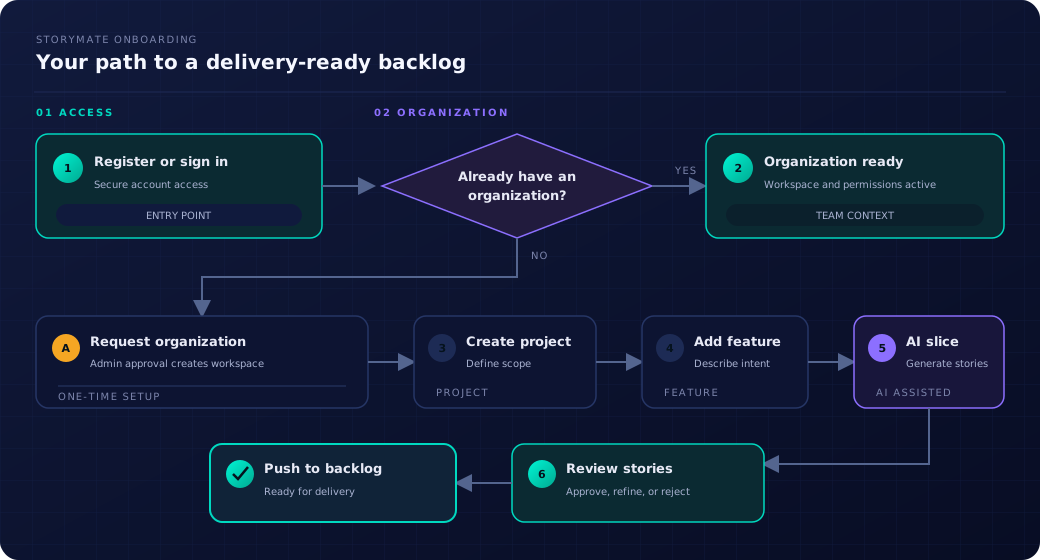
Storymate is organized around organizations, projects, and features. An organization is your company or team workspace. Projects group related features. Features are what you describe to the AI for story slicing.
Step 1 — Register and verify your email
Go to storymate.app and create an account. You will receive a verification email — click the link to activate your account before logging in.
Step 2 — Join or request an organization
Every user must belong to an organization before accessing any features. After first login, you will land on one of two screens:
- Invitation pending — an org admin sent you an invite. Click "Accept" in the email or on the screen.
- No organization — submit an organization request. A platform administrator will review and approve it, then you become the organization Owner.
Step 3 — Create a project with the setup wizard
Organizations contain one or more projects. Projects are independent workspaces — useful for separating products, teams, or clients. When you create a project, a ten-step setup wizard guides you through the initial configuration. Every step is optional and can be changed later in Project Settings.
-
1
Project basics
Enter a name (required), a project key (auto-derived from the name, editable), and an optional description. The project is created in the background at this point, so you can close the wizard at any step and return later.
-
2
Documentation sources
Connect a Confluence space or enter one or more web URLs. Storymate pulls documents from these sources and makes them available as AI context when slicing features. You can also add documents manually at any time from the Documents section.
-
3
Estimation methodology
Choose how your team estimates stories: Fibonacci story points, custom story point scale, T-shirt sizes, hours, or none. This setting is used for sprint capacity calculations in the Sprint Planning module.
-
4
Sprint and team defaults
Set the default sprint length (in weeks), team size (number of developers), and optionally an initial velocity. These values pre-fill the Sprint Planning configuration so you do not have to re-enter them for every plan.
-
5
Definition of Ready
Configure the criteria a story must meet before entering a sprint. You can run the guided six-question wizard, write your DoR as free text, or choose to inherit the org-level DoR. See Definition of Ready for details.
-
6
Domain context prompt
Describe the product domain in plain language. This text is saved as a project-level prompt that is injected into every AI slicing request, giving the model domain knowledge specific to your product. Use the Refine with AI button to polish a rough draft into structured prompt text.
-
7
Ticketing connector
Connect to GitHub, GitLab, Jira, or Azure DevOps. You can reuse an existing org-level connector or configure a new one inline. Stories pushed from this project will go to the connected backlog.
-
8
Personas
Define user personas or use persona discovery to have Storymate suggest relevant personas from your domain context and documents. See Personas for details.
-
9
Test management connector
Connect to TestRail, Xray, or Zephyr Scale to push generated test cases directly to your QA tool. This step is available on plans that include test management.
-
10
Review and finish
A summary screen shows the status of every step — configured, skipped, or pending. Click Finish & go to project to open the project dashboard. Any skipped steps show shortcuts to the relevant settings pages.
Step 4 — Create your first feature
Navigate to Features in the sidebar and click New Feature. Enter a title and a plain-language description of what you want to build.
Step 5 — Slice into stories
On the feature detail page, click Slice into Stories. The AI will decompose your feature description into INVEST-compliant user stories with acceptance criteria. This typically takes 15–30 seconds.
Step 6 — Review and push
Stories appear in PENDING status. Review each one and approve, modify, or reject it. Once approved stories are ready, push them to a connected backlog tool (GitHub, GitLab, Jira, ADO) with a single click.
See Story Review Workflow and Connectors & Integrations for details on those steps.
Onboarding flow